How to Fix a Faulty Float Switch
A float switch is an essential part of many systems, such as water tanks, septic tanks, and sump pumps. By determining the water level and turning on or off the pump appropriately, it controls how these systems operate. A float switch that isn’t working properly can cause serious problems like flooding, water damage, or system failure. This post offers a thorough how-to for locating, diagnosing, and repairing a malfunctioning float switch.
Knowing How the Float Switch Works
Floating on the water’s surface is how a float switch works. The float moves in accordance with changes in the water level. The pump is signaled to turn on or off by this movement, which either opens or closes an electrical circuit.
Float switches come in two main varieties:
A vertical rod is used by vertical float switches to move up and down. They fit well in cramped areas because they are small.
Tethered Float Switches: These feature a float that is tethered to the pump. They work well in larger sump pits because they take up more room but have a wider range of motion.
Typical Reasons for Float Switch Failure
A float switch may malfunction for a number of reasons:
- Debris and Blockage: If dirt, silt, or other debris builds up in the sump pit, it may hinder the float’s ability to rise or fall as needed.
- Mechanical Failure: The float mechanism may malfunction as a result of aging. For example, the internal switch may wear out or the float may get wet and lose its buoyancy.
- Electrical Problems: The electrical circuit may be broken by corrosion or loose connections, which would stop the switch from alerting the pump.
- Improper Installation: The float may stick or not work properly if it is positioned or installed incorrectly, which can limit its movement.
How to Diagnose and Repair a Malfunctioning Float Switch
1. Prioritize safety
Prior to examining or fixing the float switch:
Disconnect Power: To avoid electrical shock, unplug the pump from the power source.
Empty the Space: To prevent slipping or additional water damage, make sure the area is dry.
2. Check for obstructions and debris
Take out the pump: Remove the pump from the sump pit with caution.
Clear the sump pit: Clear the pit of any obstacles, sludge, or debris.
Look at the Float: Verify that there are no obstacles preventing the float from moving freely. To guarantee free movement, clean the float and its path.
3. Examine any mechanical malfunctions.
Evaluate the buoyancy of the float: To find out if there is water inside the float—a sign of a leak—shake it. It is necessary to replace a waterlogged float.
Examine the mechanism of the switch: Make sure the float travels smoothly along the rod for vertical floats. To keep a tethered float from becoming stuck, measure the tether length and make any necessary adjustments.
4. Check the Electrical Wirings
Examine the connections and wires: Check for loose connections, frayed wires, or corrosion. Clean off minor corrosion and tighten any loose connections. It might require expert care if the wiring is damaged.
Check the switch: Check for continuity with a multimeter. The switch may be defective and need to be replaced if there is no continuity when the float is in the “on” position.
5. Examine the Pump’s Performance
To simulate rising water levels, plug the pump back in after taking care of any possible problems. To replicate a rising water level, manually raise the float and watch to see if the pump turns on. If so, let the float drop and make sure the pump shuts off appropriately.
6. If required, replace the float switch.
Should troubleshooting reveal a malfunctioning float switch:
Find a Complementary Substitute: Make sure your pump model is compatible with the new float switch.
Observe the manufacturer’s instructions: As directed by the manufacturer, install the new switch. This could entail setting adjustments, securing the float, and connecting wires.
Preventive Steps to Guarantee Lifespan
To keep your float switch functioning properly and extend its lifespan:
Frequent Upkeep: To avoid debris buildup, periodically check and clean the float mechanism and sump pit.
Test the System: Make sure the pump and float switch are operating properly by testing them on a regular basis, particularly before periods of high precipitation.
Professional Inspection: To find and fix possible problems early on, think about having a professional examine the system once a year.
In conclusion
For systems like sump pumps to operate effectively, a working float switch is essential. Major problems like flooding or system failure can be avoided with timely repairs, routine maintenance, and efficient troubleshooting. You can protect your property and prolong the life of your pumping system by following the above steps to make sure your float switch operates dependably.

Using a float, magnet, and reed switch system, a float switch senses the amount of liquid in a tank and automatically opens and closes in response to changes in the water level.
A float switch is a kind of level sensor, a tool used to determine the amount of liquid in a tank, according to WikiPedia. In one pattern, a float with a magnet inside is positioned around and guided by a reed switch that is mounted inside a tube. The float closes when the magnet is raised to the reed switch.
In essence, dry contacts are opened and closed to operate float switch systems. An electrical signal will be sent to activate a water level alarm once the dry contacts are opened or closed. The control panel can determine whether the water level is too high or too low by using the water level alarm. If your water level is automatically controlled, the control panel will instruct the pump to start refilling or emptying the water automatically.
The Operation of New Float Switches
With 99% uptime over 15 years, never replace another water level controller or float switch. In terms of float switch and water level control technology, Water Line Controls is the industry leader.
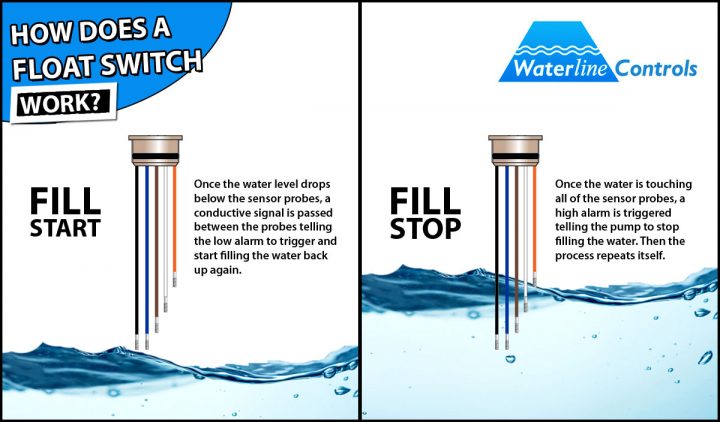
The ground-breaking Float switches from Water Line Control sense and detect the water levels in a tank (water, oil, gas, etc.) by using stainless steel probes rather than float switches.
In order to prevent fouling, degradation, and deterioration, the stainless-steel sensor probes function as independent sensors and do not conduct electricity.
The unit’s head houses all of the controller’s electronics, allowing for direct connection to your control panel. One of the six alarms (Low Alarm, High Alarm, Fill Start, Fill Stop, etc.) will sound as soon as one of the sensors detects the water level. Your water level control system can be configured to sound a single point or multi-point alarm, depending on the type.
The various start and stop mechanisms are managed by different alarms. For instance, if a water tank’s low alarm was set off, it could do one of two things (or both in some setups).
Your control board’s LED light will turn on in response to a low alarm in a single point float switch.
A low alarm will activate the LED light on a multi-point float switch. It will also send a signal to turn on or off a water pump automatically, refilling or emptying the water to the pre-programmed level.
Typically, water level controls and float switches are initially closed, which means that since the water level is at the set height, no alarms need to be set.
Why Choose Water Line Controls
All of our water level controls and water level control systems are assembled right here in the U.S.A. where we monitor every step of the process. The are many reasons to choose Waterline Controls™ for all of your float switch and water level controller needs include:
SIMPLE DESIGN
No moving parts or mechanical floats to break or rust!
BEST TECH SUPPORT
No runaround, no guessing, no stupid answers. You’ll talk to the guy who’s been designing and installing these units for over 20 years.
BUILT TO LAST
Makes it easy to integrate with existing Building Management Systems and has an expected useful life of 15 years.
TOUCH TO TEST
One push of the button starts a complete validation cycle to ensure all systems are working properly.
RELIABLE & ACCURATE
Will not foul, plate, or deteriorate regardless of water quality.